How to manage stock locations
Learn how to optimise your stock management by effectively managing your stock locations to improve accuracy and efficiency.

Written by Ian Oldrey
Updated at March 4th, 2025
Table of Contents
Managing Stock Locations
To manage the locations for a business/depot/quay, including adding products to locations, click on ‘Stock’, ‘Stock Locations & Codes’
When you first use the Stock Locations manager there will be a default location setup for each Depot and Quay setup on Merchanter.

Locations Hierarchy
The Locations within Merchanter are a multi-level hierarchy. You can choose how many levels you want to go down to, depending on the layout of your sites and the areas that are known to the people in the business.
Adding Locations
To build your hierarchy click on the ‘+ Location’ button next to any location to add a child location within it. You will need a location name and a 2-character code.
Using location codes multiple times
The two-character code can be repeated in multiple locations but must be unique within one location. For example, you can have location A1 within 3 aisles of a shop, but you can’t have A1 several times within Aisle 1.
Editing Locations
Click on the pencil icon in the location banner to edit the name/code or add sub locations to any location
Deleting Locations
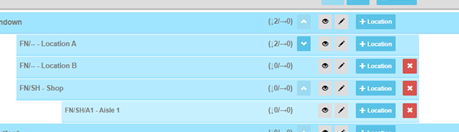
If a location has no products in itself or any of its sub-locations it can be deleted using the red cross button.
Managing Products in Locations
Adding products to Locations – manual
As well as adding a product individually as described earlier in this document, you can add multiple products to a location from the Stock Locations Manager.
In the banner of a location click on the eye icon. This opens the product manager for that location.
To add products to this location click the ‘+ products’ button top right. This opens a product listing with filters. Use the filters and search criteria to get to a get to the products you with to add to the location.
You can either click ‘Select all’ to highlight all the products in your search, or click on products individually to highlight them. Once you have highlighted the ones to add click ‘place selected’

Good practice suggestion
In Merchanter you can add products to any level in the hierarchy, so for example you could have some products in Warehouse 1 and other products in Warehouse 1/Aisle A. We would recommend only putting products into the end nodes (lowest level) of the hierarchy, so they are all at the same level across the depot.
Adding products to locations – import from spreadsheet
If you want to bulk upload products across multiple locations click ‘Import from Excel’ top right.
Select the template to use and download a copy. This simple spreadsheet has 3 columns:
- Product Code – this is the main product code from Merchanter
- Location path – this is the code string for the location you wish this product to be added to. In the screenshot above the location path is GU/W1, which describes Warehouse 1 in the Guildford Depot
- Sequence Number – you can optionally add a sequence number. This is used to sort the sequence products are held within a location
Multiple products on the spreadsheet
A product can be held in multiple locations, so can appear several times on the spreadsheet. The same product cannot be added multiple times to the same location.
Only add items to lowest location in hierarchy
You only need to add a product to the lowest level of location it is held. It will be shown within the parent locations automatically. For example, if you add a product to Aisle A in Warehouse 1, it will show in Aisle A and in the larger list of Warehouse 1 products.
Sequencing Products in a Location
Products held in a location can optionally have a sequence number. This number provides a sort order to help when checking stock to either show the products in a logical sequence based on product code or description, or to be in a sequence as they are physically stocked in the location to speed counting/checking.
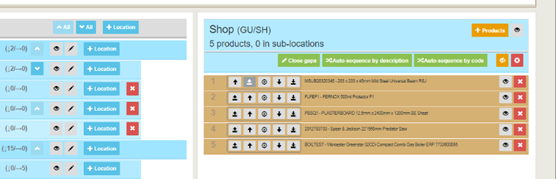
Once you have products in a location you can either automatically set the sequence by product code or description using the green buttons above the list of products.
Once sequenced you can use the grey navigation buttons to move the products in the sequence.
Clicking on the eye icon will take you to the quick product summary
Clicking on the red cross button will remove that product from that location (does not delete the product)
Clicking the eye icon either in the blue banner at the top of the product list or in the blue location banner in the Location hierarchy will bring up the location overview.
In the location overview you can perform a number of operations
- Export to Excel –this exports the products in this location to an Excel spreadsheet
- Select All/Deselect All – use these buttons to highlight all or none of the products in the list. Once selected you can deselect individual products with a single click
- Auto sequence by code – adds a sequence number based on the alphabetic sequence of the product codes
- Auto sequence by description – adds a sequence number based on the alphabetic description of the products
- Close gaps – If you have a manual set of sequence numbers this will renumber them in that sequence with a 1,2,3… sequence
- Remove – remove highlighted product(s) from this location
- Reset sequence – blank the sequence
Highlighting a single product you can change the location with the navigation buttons (top right) and manually enter your own sequence number.
Once products are sequenced adding products for stock counting, they will appear in location/sequence order.