Stock Counts
Stay up to date with your stock levels and improve your stock confidence

Written by Dominic Oldrey
Updated at April 6th, 2023
Table of Contents
Types of Stock Count
There are two modes of stock counting:
-
Live stock counts
- On-the-fly counts that perform instant updates
- A quick way to perform a stock adjustment or improve stock confidence
- Best for counting packs and specified length products
-
Offline (Excel) stock counts
- Allow entering count data after the fact
- Best for large counts with many people involved or where tablets/laptops cannot be used
- Not suitable for counting packs and not recommended for specified length products
Post build 5532
Whilst most of the information in this article is relevant to any version of Merchanter doing a stock count, some reference is made to changes of screen layout and some functionality that was introduced in build 5532 (April 2023)
Selecting Stock to Count
There are several ways to initiate a stock count:
Ad-hoc stock count from product locations view:
On the product locations tab you can click the "Count" button to create a new ad-hoc stock count for that product and location:

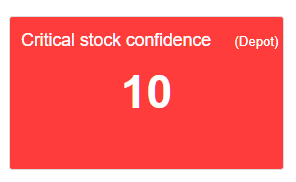
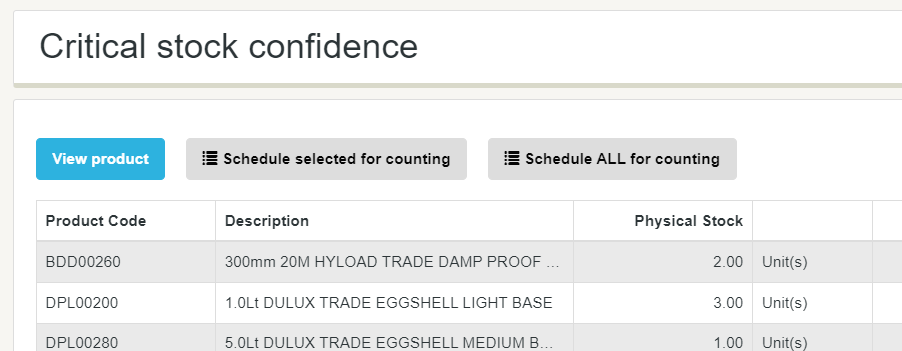
Stock Confidence KPIs
Clicking on a stock confidence KPI will show a list of product stock locations with that status. From there you can select to schedule them for counting:
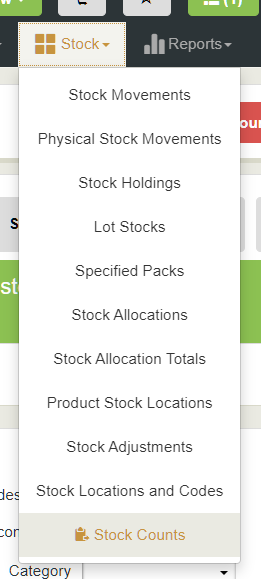
From the stock count overview page:
View the stock count overview page from the Stock menu dropdown in the top navigation bar:
The overview page has different stages of stock count jobs. Step 1 is identifying what to count. This can be done by product or location:
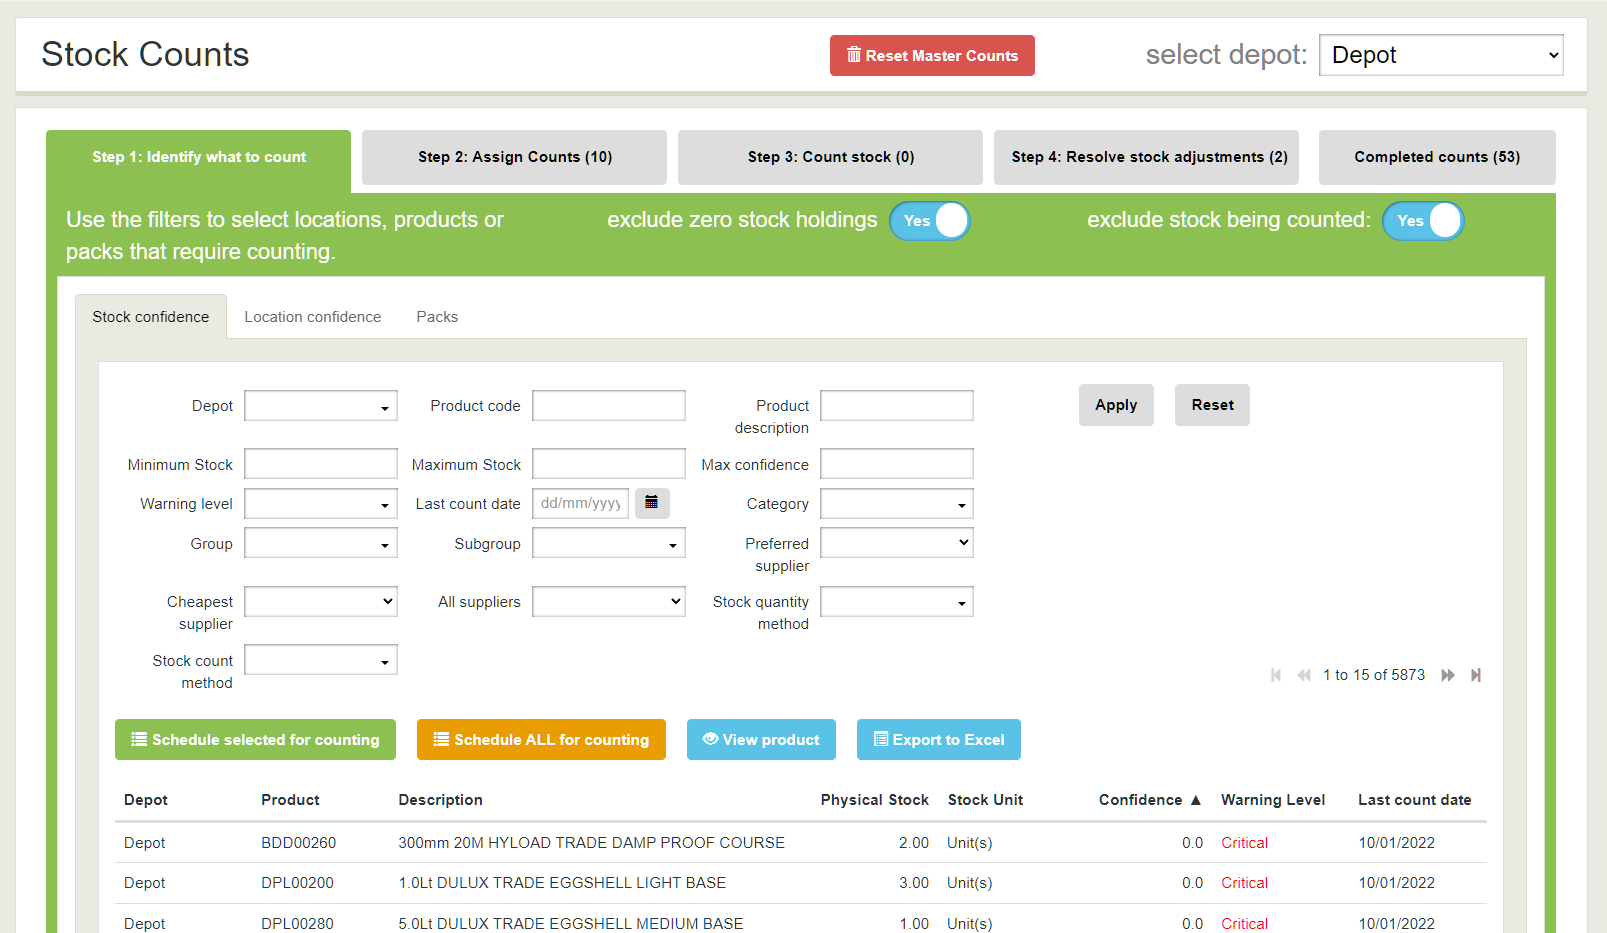
You can use the filters to identify a list of stocks you want to count. This can be based on stock confidence, categorization, suppliers and so on. Above the list are global filters to exclude products with zero expected stock, or stocks that already have an active count in progress.
Please note that scheduling large numbers of stocks to count can take some time.
Counting products stocked at multiple locations
If a product is set to depot level stock control but has multiple stock locations defined, adding the product to a count will create a count line for each location. For this reason, when you add one product in step 1 you might see more than one count line in Step 2: Assign Counts.
Creating a Stock Count
Once you have identified stock to count, you can use step 2 on the stock count overview screen to create an individual count:
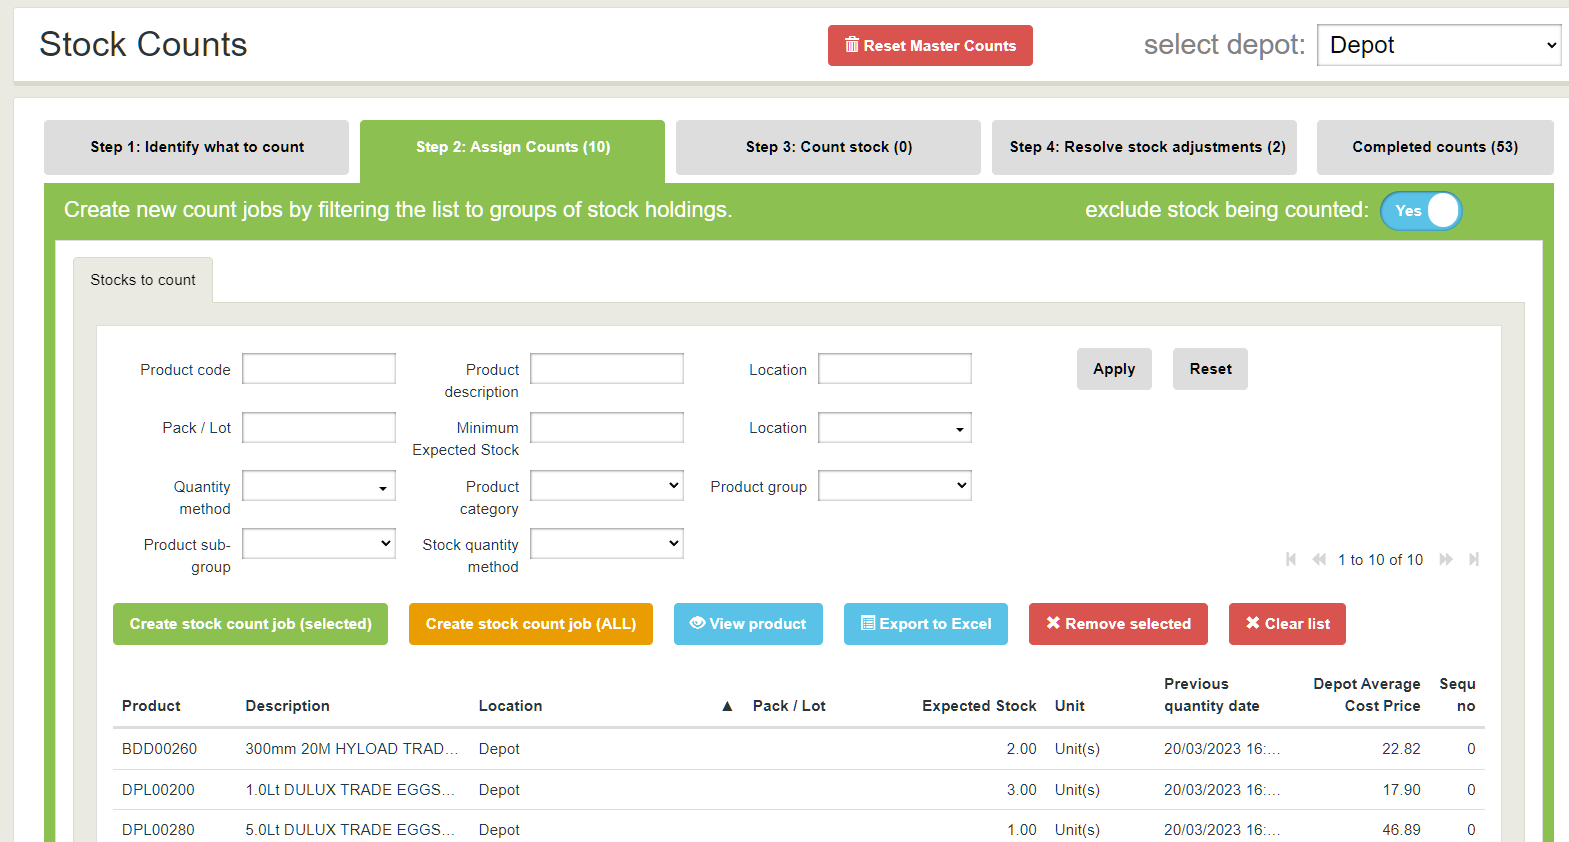
Again, you can filter to a list of product stock locations you wish to count and then click the button on the grid to "Create stock count job" for either a selection of lines or all lines in the table.
If you no longer wish to count specific products you can remove them from the table, or clear the list entirely to start from scratch.
Once a count is created it is automatically opened as a draft count:
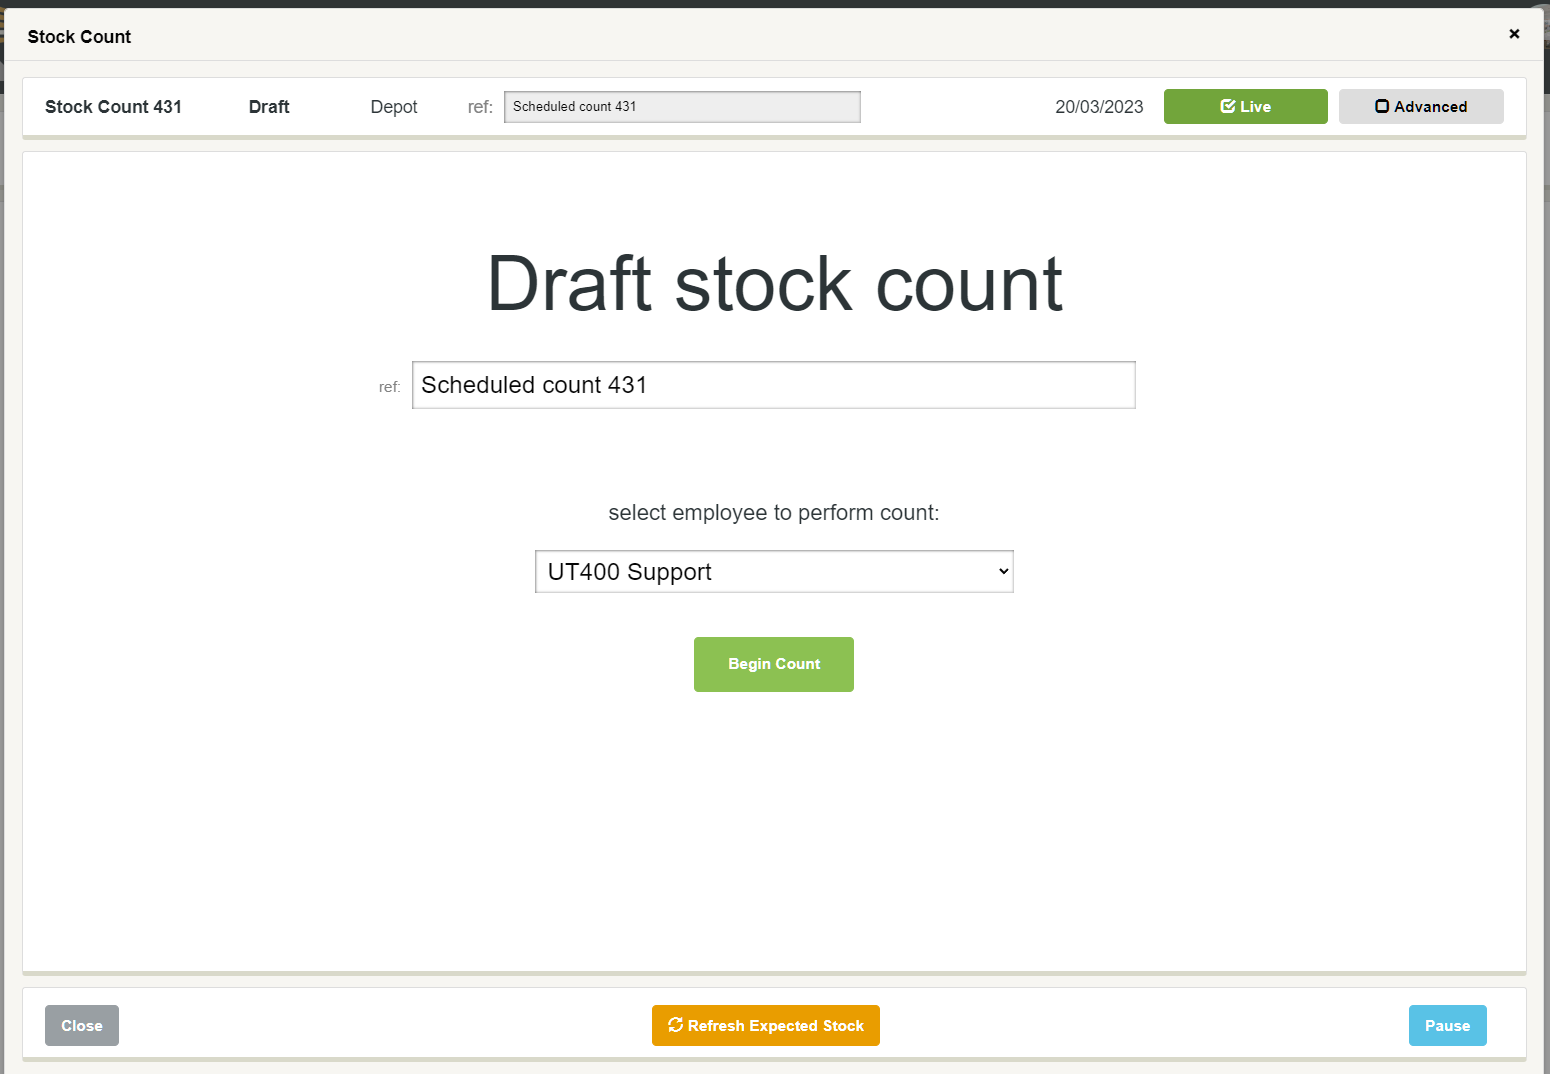
From here you can give the count a reference, assign it to an employee to count, or begin counting data yourself. The default mode for a stock count is "Live".
Live Stock Counts
Live counts present the user with a list of product stock locations to count. They can choose to see this list by location (Default) or product.
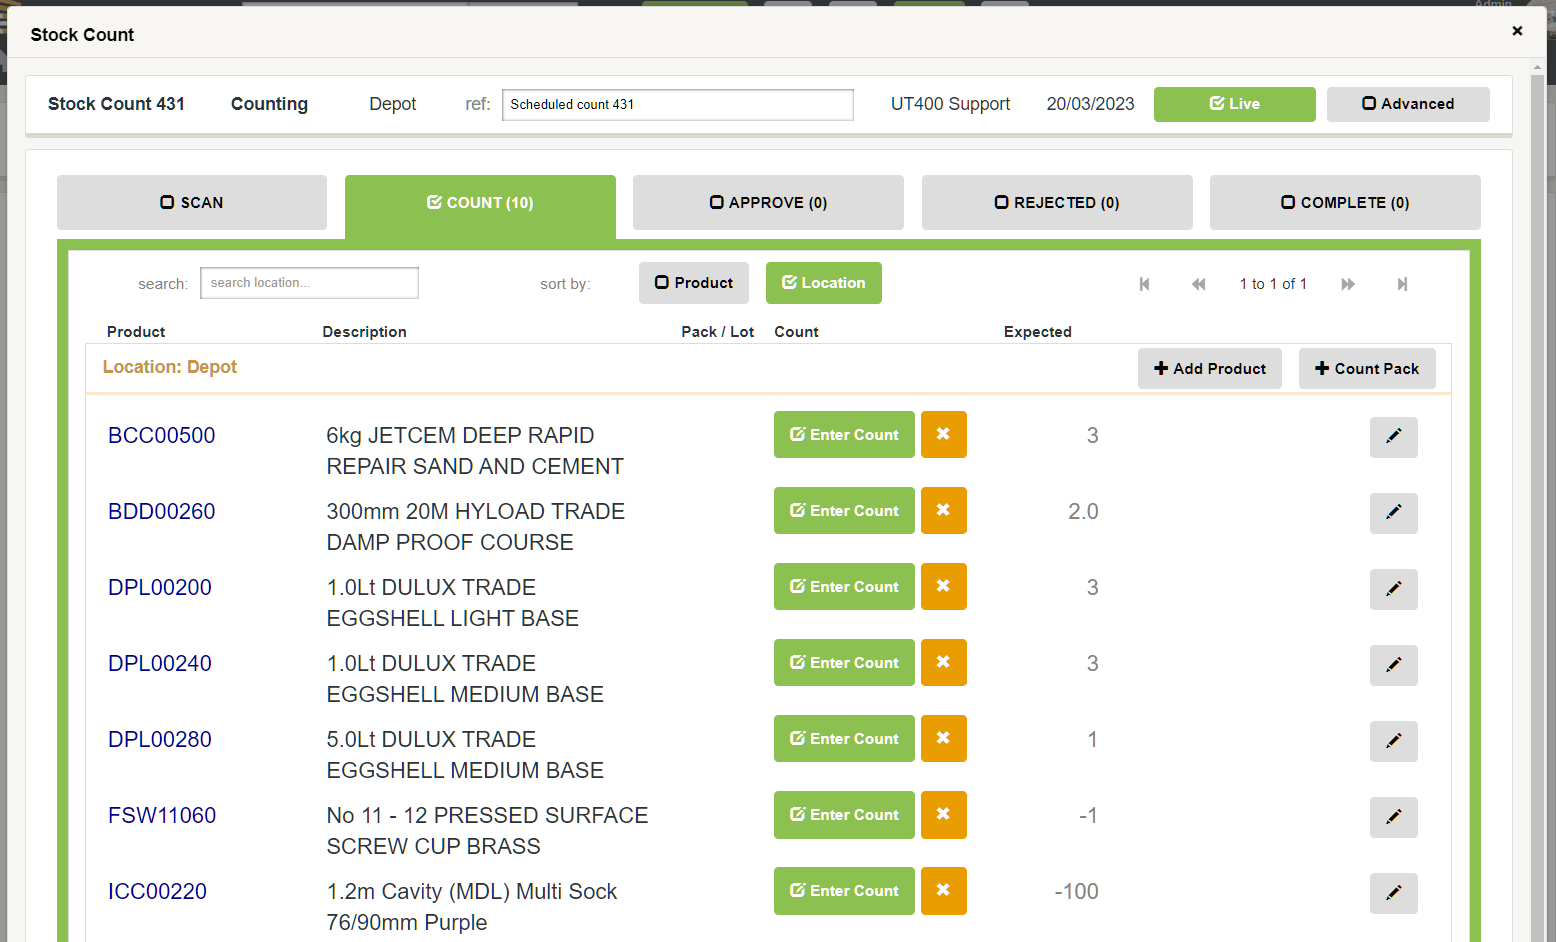
The expected stock (At the time the stock count was created) is shown for reference. You can update the expected stock levels for uncounted product stock locations with the button at the bottom of the count page:

For each line the person performing the count can either click the green button to enter the count (quantity entry is the same as for sales orders), or press the X button if there is no stock of that product at the location.
Processing Live Counts
When a count is submitted on a live count the system compares the count level to the expected current stock at the location.
If the count matches the expected stock then the line is automatically completed. No stock movement is invoked, but the stock confidence for the product stock location is set to 100%. This line can now be found in the Complete tab of the stock count.
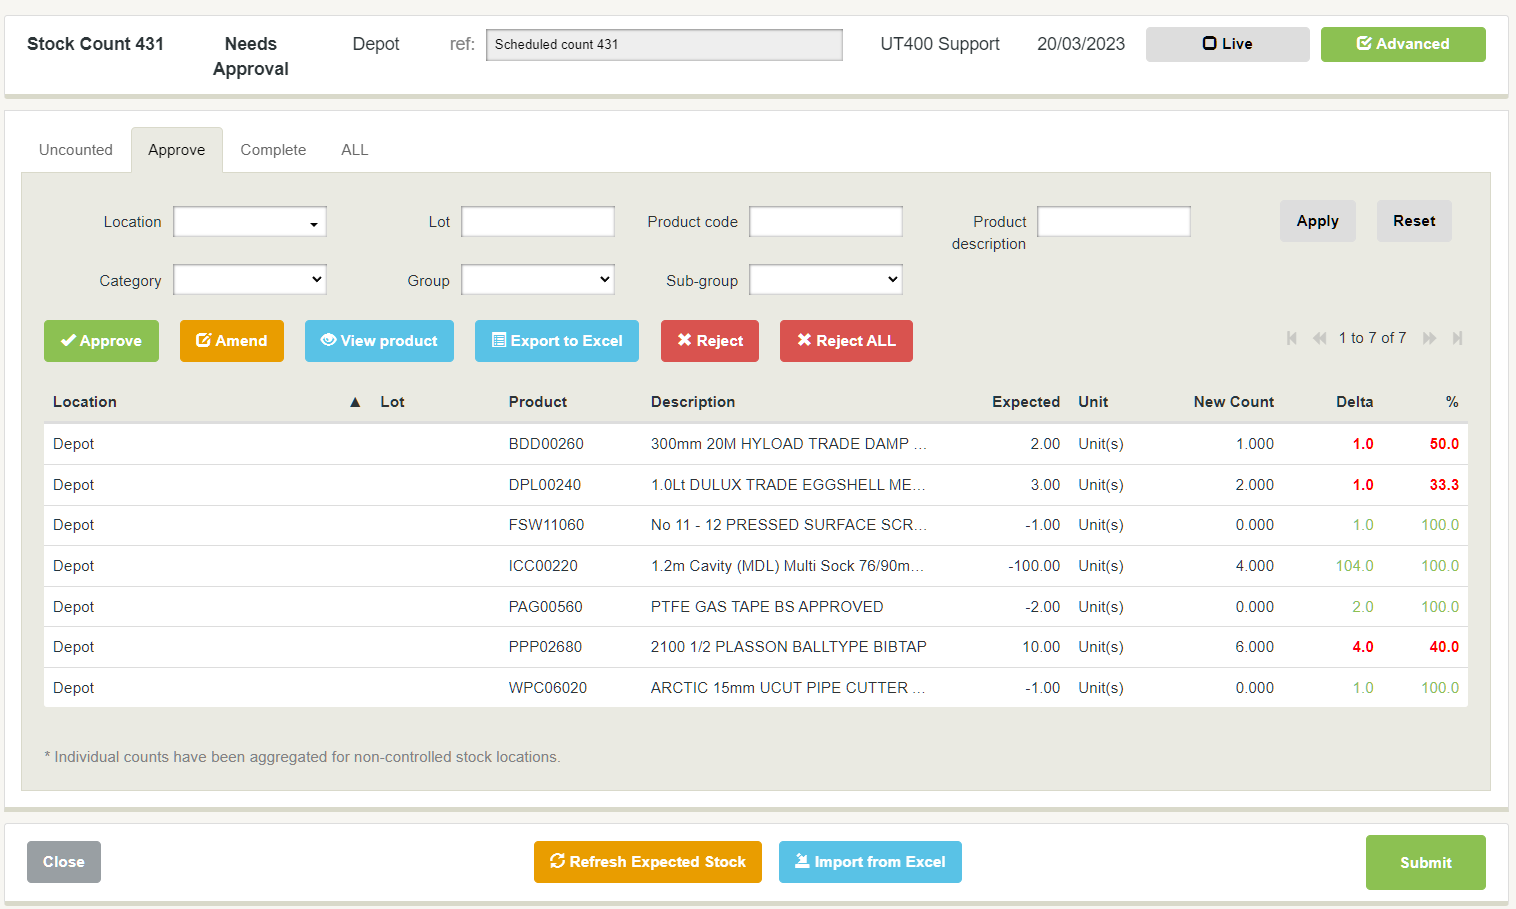
When the count entered differs from the currently expected stock then the line is moved to the Approve tab of the count:
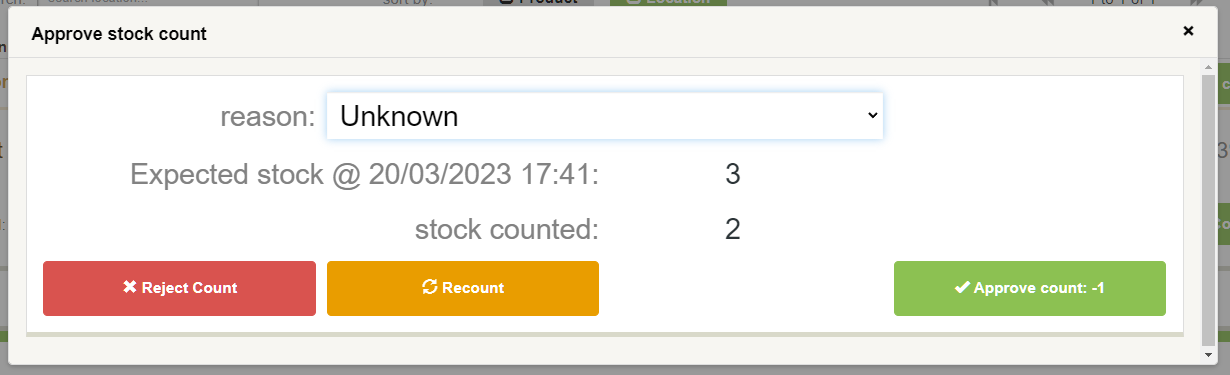
Approving Counts
On the Approve tab, a senior user can see all the count lines where the count didn't match the expected stock level.
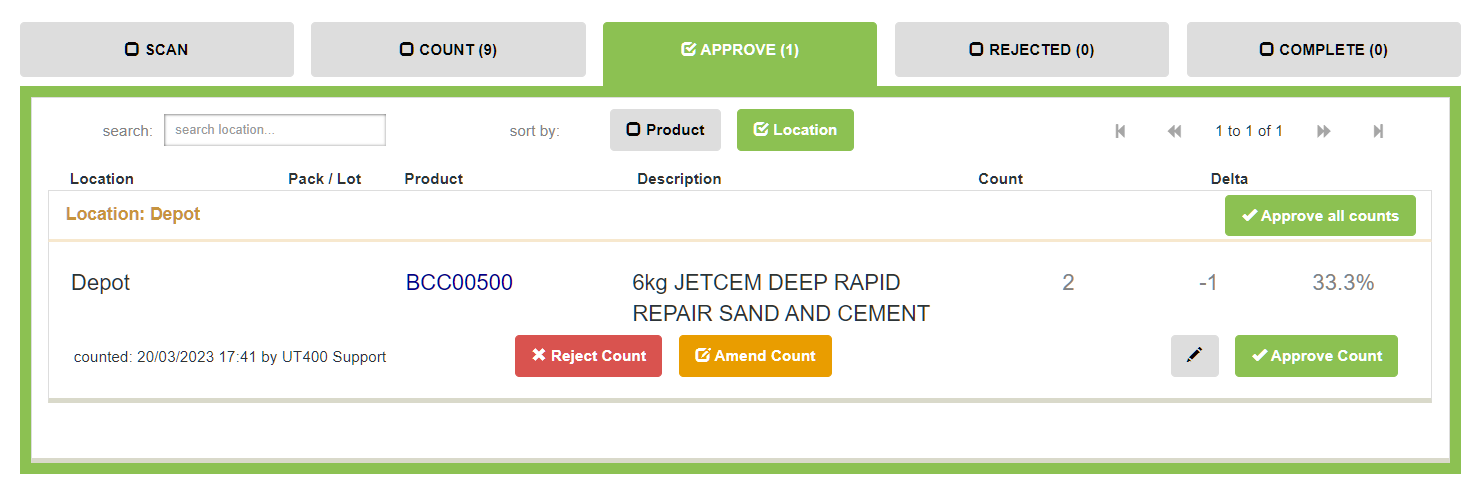
For each line, they can:
- Reject Count - This moves the count to the Rejected tab, where it can be scheduled for recounting.
- Amend Count - Enter a new value for the count. You might want to do this if the count was an obvious typing error
- Approve Count - Confirm the count was accurate and adjust the stock accordingly
Clicking on Approve Count shows the count approval screen. This shows the details of the count and gives the user the options to confirm the count was correct or schedule it for recounting:
Offline (Excel) Stock Counts
A stock count can toggle between live and advanced modes. The advanced mode allows exporting and importing count information from Excel. This can be useful when doing large stock counts.
To toggle to advanced mode click on the mode button in the top right of the stock count view:

Exporting Stock Counts to Excel
From the "Uncounted" tab you can filter and export count lines to Excel. Rename the file how you would like it, and then enter the count values in the New Count column:

Working with Excel files
You can hide columns on the Excel file, but do not delete them. The import process uses them to find and update the correct count item.
Excel counts should not be reused. Each time you wish to perform an Excel count, you should export a new Excel file.
Importing Stock Counts from Excel
Click on the Import from Excel button at the bottom of the advanced view of the Stock Count to launch an import.
Why is the import button on the stock count view page?
Each Excel line corresponds to a specific line in a specific stock count. You could in theory merge together lots of excels for different stock counts into one big file and import them, but that would be slower to process. The import button is on the stock count advanced page to remind users they are importing data into that count, not creating a new count.
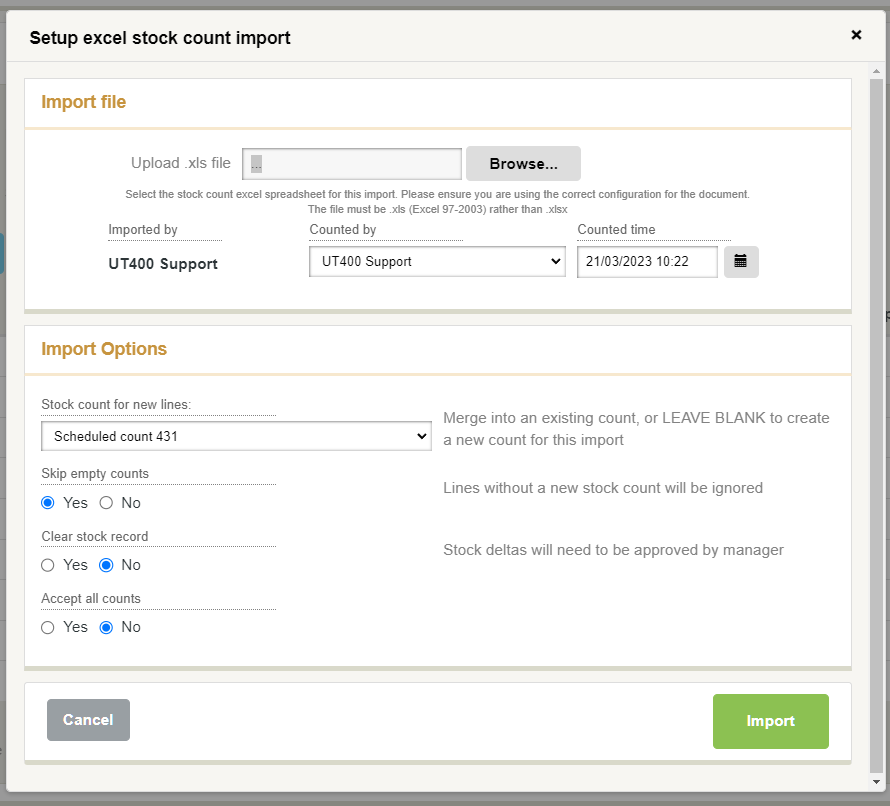
Import header options:
- Browse to add the excel file with the counts
- Set performed the count. This defaults to the active user
- Set the count date & time. Be sure you have set this correctly, as it defaults to the current date and time
The key difference between offline and live stock counts is the ability to set the count date and time. For an offline count, the stock record is rewound to the specific date for comparison against the counted value. Unfortunately, specified length-controlled products and multipack products cannot be rewound currently.
Example stock count scenario
The yard manager sets up a stock count on Wednesday for a full stock count at the weekend. There are five paint pots on the stock record (Expected previous stock).
Before the weekend, two pots are sold.
At the weekend, a member of staff counts three pots of paint on the shelves and adds that to the excel file.
On Monday, a delivery of 10 pots is received to stock.
On Tuesday, the yard manager imports the excel stock count. He enters that the count was made on Sunday at midday.
At the point that the Excel is imported, the expected stock would be 13 pots of paint. (5 original - 2 sold + 10 received). However, because the date was entered for the weekend, the expected stock for the count line is set at three (5 original - 2 sold).
The count value of 3 pots tallies with the expected stock at that point in time, so the count line is automatically approved. The stock confidence of the product location is set to 100%.
Import options
- Stock count for new lines: If the count line cannot be found, a new count line can be created. This defaults to the open stock count, but you can select a different count or leave it blank to create a new count. This is an advanced feature and is not recommended best practice.
- Skip empty counts: If this is true, lines without a new count are ignored. If it is false, their new count value is set to zero.
- Clear stock record: For most use cases, this should false. When it is true at the point the stock count is accepted, the stock confidence trustability of the product is reset to starting values. This is most useful if a system has been used for training purposes and you wish to reset the data.
- Accept all counts: As the name suggests, setting this to true will automatically accept the counted value as correct. If it is false, then a manager will need to review and approve each line where the stock count value differs from the expected stock value.
Import speed
Importing a large count can take some time. On average, the system will process 5 - 10 lines per second.
It is recommended you open a new tab to continue working whilst the import processes.
Finishing an Excel Stock Count
Once the Excel file has been imported, the process to finish the count is the same as for a live count.
Counts that were as expected are automatically completed. Any counts that differ from the expected value will be shown in the Approve tab.
Once all lines have been counted then approved or rejected, the count will be marked as complete.
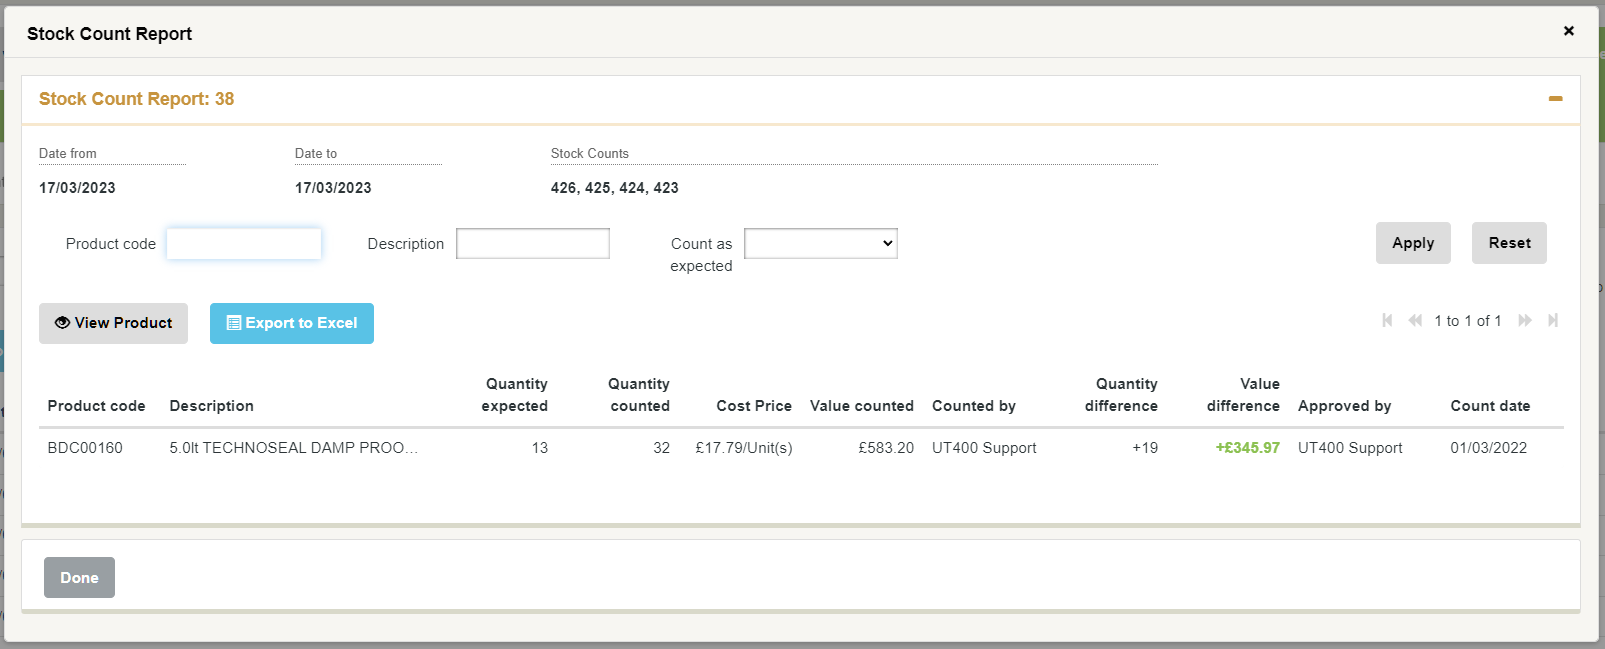
Stock Count Reports
Senior users can generate stock count reports for one or more stock count from the Complete tab on the stock count overview page:
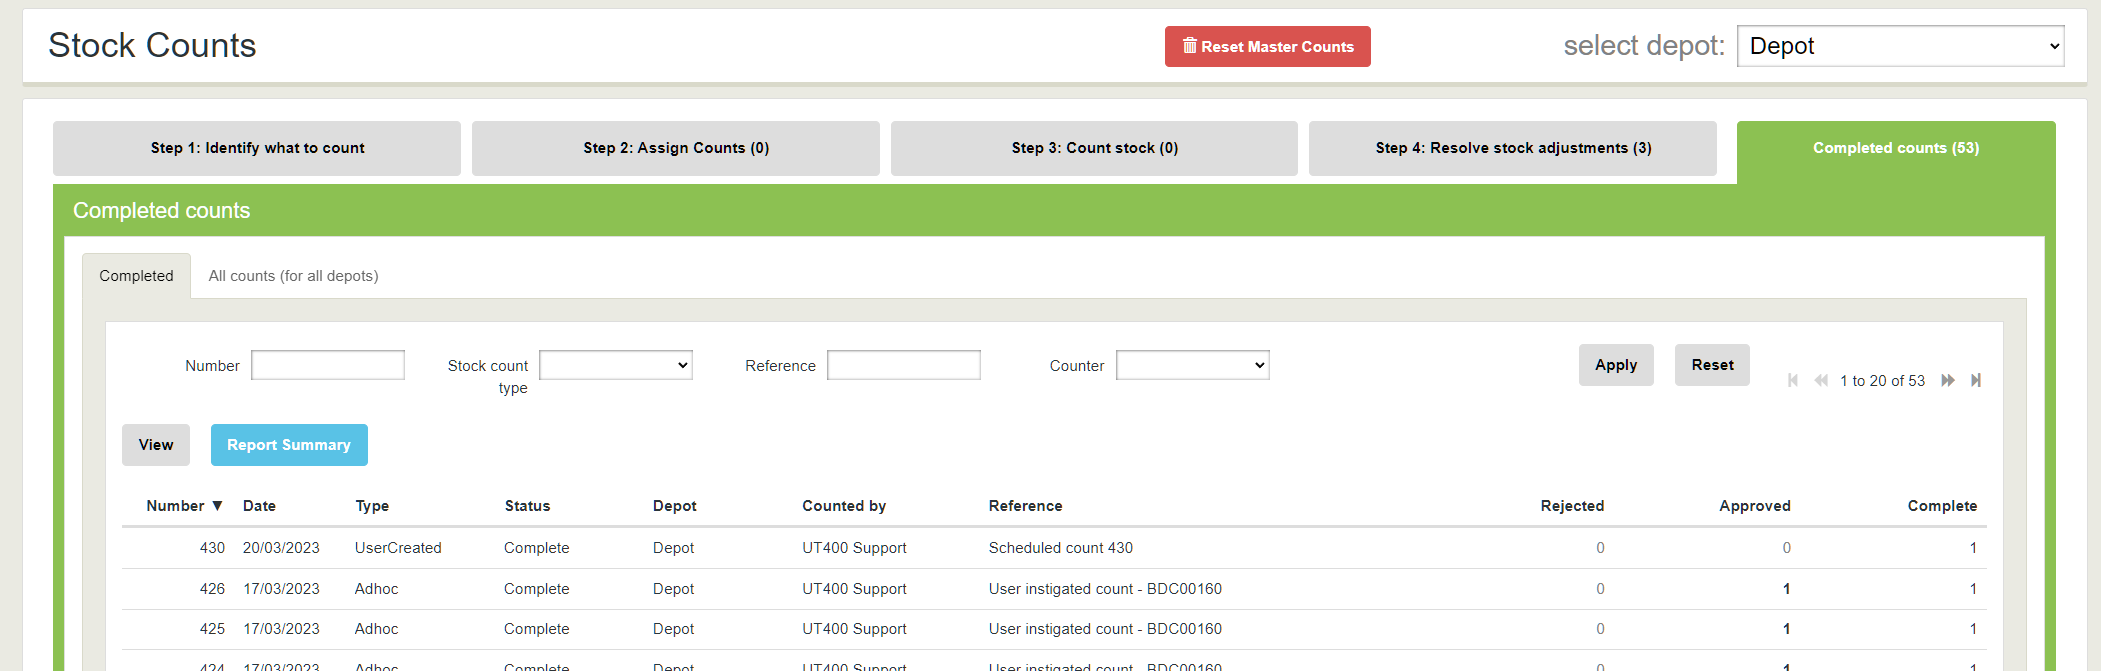
Select the counts you wish to generate a report for and then press the Report Summary button.
The report may take a while to generate depending on the number of counted lines. Counts for the same product are aggregated into one report line, so if a product was counted down 2 units and then up 1 unit the line would show a net quantity difference of -1 unit.
The example below shows the aggregate of four ad-hoc counts of the same product.
Build Number: 5532
Release Month & Year: MAR/2023