How to update Microsoft Word document templates

Written by Ian Oldrey
Updated at December 22nd, 2025
Table of Contents
This is an overview of the way to work with Microsoft Word and AuraQ Document Generator to edit templates for MERCHANTER document generation
Microsoft Word Templates
Designing documents is predominantly done in Microsoft Word. This document will give some of the features to use, but a thorough understanding of Word is useful. Additional tools and tips can be found in the Word help files
Document Types
Despite the wording that you are creating templates in Word your documents should be saved as a normal Word Document (*.docx) and not a Word Template (*.dotx)
Using Merge Fields
AuraQ uses Merge Fields to define where data should be inserted into a document
Adding the Insert Field button to your Quick Access toolbar
Add the Insert Field button to your Quick Access toolbar, so it is simple to add new fields.

- Insert Menu
- Quick Parts Drop Down
- Field – right click
- Add to Quick Access toolbar
- Will appear in the menu at the very top left of Word
Adding a new merge field
 When you wish to add new merge field to the document:
- Click on the Insert Field button (in Quick Access Toolbar)
- Type “mer” to navigate through the list to ‘Merge Field’
- Give the field a name
NOTE: Names should be alpha numeric. AuraQ will reject any special characters used (!,”,£,etc.) - Tick if the field should have a prefix or suffix
- Click OK
Percentage fields
For percentage fields add a % suffix to the field in Word. You can add a % suffix to the formatter in AuraQ, but this will /100 the data in the field. Useful if the data is held on the database as a fraction (i.e. 20% is held as 0.2) but MERCHANTER percentage fields are held as a number for the percentage (i.e. 20% is held as 20)
Currency fields
As a shortcut you can add a £ as a prefix field to currency fields, however this won’t change with multi-currency orders, so it is better to have a separate merge field for the Currency Symbol from the database.
Merge Field Names
Word puts a name in with special characters to display that it is a merge field. This will be used by Word to control the formatting of the document, so try and give each merge field a name that is roughly representative of the size of the data that will go into the field. Otherwise you end up with challenges getting the template to look smart.
Editing Merge Fields
The formatting you set on the merge field will be carried over to the merged data, including font and size, position (tabs), spacing, colour, etc.
TIP - Selecting text to edit
When looking to edit the format of a merge field a single click highlights the whole merge field.
However, this is to denote that it is a merge field and doesn’t mean the field is actually highlighted for editing. Make sure you drag to select the whole field before applying any changes.
Merge Areas
A document brings in data from one or more Merge Areas. By default, a document has a merge area called ‘document’ which is the data from the source table (most likely Sales Order or Purchase Order).
Additional merge areas can be added to bring in data from other associated sources, for example order lines, a VAT table, or a formatted address.
Adding a merge area
To add a Merge Area
- Insert a new Merge Field (see Adding a New Merge Field section)
- Enter name of TableStart:xxxxxx
- Insert a second Merge Field
- Enter name of TableEnd:xxxxxx
Same Merge name for start and end
the xxxxxx entry should be the same for table start and end
You can then enter data merge fields between TableStart and TableEnd. They will be mapped to the data set (Reference or MicroFlow) that you map in AuraQ
TIP - Making Table Start End references stand out
Change the font of the TableStart and TableEnd to be Gold, so the data fields will be clearer to format.
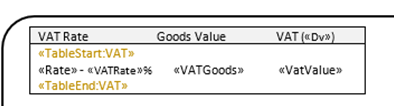
Table Data (Repeating Rows)
When data needs a number of repeated entries (order lines in an order) then the table should be added to a table. This gives a static header row and a data rows that are populated by the data. Below is an example of lines in an order, where the row types are nested to display both goods and text lines or the order.

A Merge Area should be placed within the lead data row of the table to see the data repeated.
This example has a table for all the data, which has been formatted to have a black header row and an outer border. Then there is a second table nested within it that contains the goods line, with its quantity, description, price, etc. This has no visible borders, but the table keeps the data in clear columns. If the main table was only listing the goods lines the data could be in the main table cells, but because the lines of the table will be a mix of goods lines and text lines, a nested table is needed to work with the different layouts.