Doing an invoice run in Merchanter
Table of Contents
In Merchanter sales orders can be processes as cash sale or on a credit account. The cash sales generate invoices either at the point of full payment, or payment and supply, where the credit account invoices are generated using a batch process.
Why run a batch rather than creating invoices once supplied?
There are two purposes to running a batch invoicing operation rather than live invoicing. Firstly there are a number of checks that are worth working through prior to invoicing to reduce the likelihood of needing to raise credit notes. Secondly for invoicing that need printing the ability to group invoices by customer reduces administration and postage costs.
Invoicing KPIs
There are several KPIs for users who are managing account invoices. These can be added to your dashboard (Personalise Dashboard) or view in Reports menu under ‘Invoices & Credits’.

These show the numbers of invoices to be invoiced and the total number invoiced month to date and year to date with the total value for both.
Doing an invoice run
There are several steps to performing an invoice run. You can do an invoice run as often as you would like, for an individual invoice, or even a full month’s worth. We would recommend a daily invoice run as a good guide for an active business.
From the Sales menu in Merchanter select ‘Invoices & Credits.’
On the left-hand menu open the ‘Audits & Invoicing’ menu.
There are numbered steps for the invoicing process that will help guide you through.
Step 1 – Orders & Credits to approve
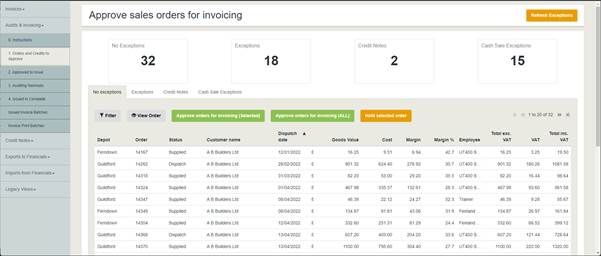
The first step is a management check to confirm that the supplied orders are ready for invoicing. This check can be done by members of the management team, or the finance team, depending on the structure of the organisation.
These checks are done to minimize any errors in invoicing, and editing the order prior to invoicing, therefore reducing the need to raise credit notes.
When you first click on the button (Orders & Credits to Approve) the system runs a check against all the orders that are either dispatched or supplied. These checks can include:
- Audit Order Margin – check invoice against depot or ledger margin levels
- Audit Line Margin – check each line on an order against a minimum margin for the product
- Audit Sales Value - check the sales value is greater than zero
- Audit Costs - check cost values are greater than zero
- Audit Line Descriptions - raise an exception when a product description has been changed on an order line
- Audit Specials - raise an exception when a special is ordered
- Audit Discounts - raise an exception when the discount is above system setting percentage
- Audit Header Totals - raise an exception when the header total does not match the total of all order lines
Setting Audit checks
The system administrator (Prime User) can set which of these checks are performed for your business. (Settings > Organisation Settings> Business Settings > Invoice Auditing)
When the check is done the orders will either show in the ‘No Exceptions’ tab, or ‘Exceptions’ tab.

-
 No Exceptions – these are the orders that have passed all the checks. These should be able to be approved as a group. Individual orders to hold from invoicing can be selected and placed on hold. This sends them to the exceptions list with a user entered note.
 -
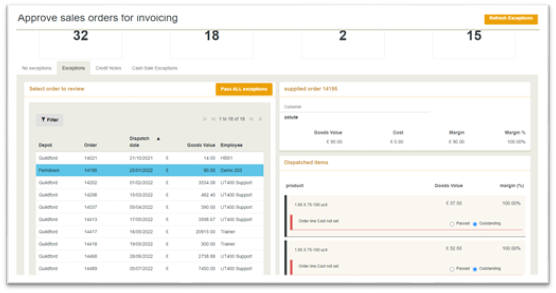
Exceptions – orders with exceptions will appear in this list. The person checking them can select one order at a time from the list on the left and see the header and line details on the right, with the identified exception highlighted in red.
- Credit Notes – these are any draft credit notes that should be approved.
- Cash Sale Exceptions – the same checks are performed on the cash sale invoices, however as an invoice has been raised there is less scope to amend the order. Things like missing costs can be added, but errors in pricing would require additional invoicing and/or raising credit notes.
Step 2 – Approved to Issue
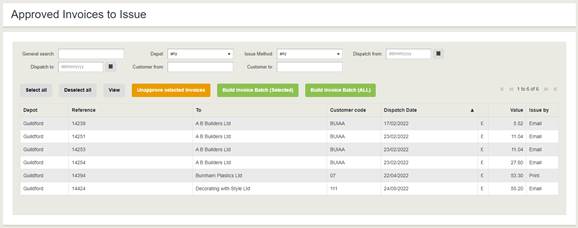
This step can be done by the finance team and is the start of generating and issuing invoices to customers.
Merchanter works on the basis of batch invoicing, grouping together account invoices to process together. When you are ready to do an invoice run select one/several/all the approved orders from the list, selecting ‘Build Invoice Batch (Selected)’ or ‘Build Invoice Batch (ALL)’. This launches the invoice wizard.

1. Customers to invoice – the first step of the wizard shows the customers who will be receiving invoices, with the number of invoices, total value and their default preference for print or email invoices.
a. Enter a batch reference (can be any format, we recommend the date and a number)
b. Confirm the correct invoices are in the batch

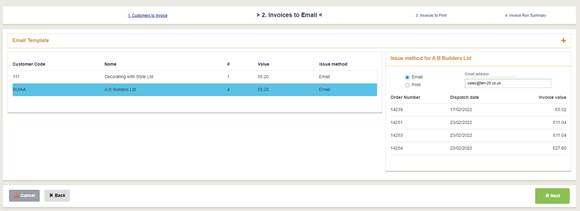
2. Invoices to email – lists the customers with invoices to email. Highlighting a customer name shows the email address to use (amendable), the option to push to print and a list of the orders to be invoiced.

3. Invoices to Print - lists the customers with invoices to print. Highlighting a customer name shows a list of the orders to be invoiced.
a. A default invoice printer is shown in the dropdown, but an alternative can be selected
4. Invoice Run Summary – final confirmation prior to processing the invoice batch. Clicking ‘Process Invoice Batch’ will:
a. Email invoices to email customers
b. Print invoices to print customers in customer sequence
c. Export invoices to sales ledger on financials software
d. Generate a batch summary report and email to selected email address
Other steps and views
Steps 1 & 2 above are the main parts of doing an invoice run. There are additional steps and views available to help manage invoices:
- 3. Awaiting Nominals – when invoices are sent to the sales ledger they are allocated a nominal code to ensure they are analysed correctly in the nominal ledger. This code is built from the facets used in your nominal ledger*. If a suitable entry is not mapped from the nominal ledger the invoices are held in this list prior to exporting to the financials. This might be for example a nominal by product category, where a new category has been added to Merchanter, but not mapped to the nominal ledger. Once the new category is mapped you can select the relevant invoices and click ‘Determine Nominal of Selected Invoices’. This will apply the nominal code and export the invoices to the sales ledger.
- 4. Issued to Complete – As payments are received and reconciled on the financials software a fully paid invoice will update from Issued to Complete on Merchanter. This view can be used to manually set invoices to complete prior to the reconciliation on the financials.
- Issued Invoice Batches – This is a list of the invoice batches that have been done. Double click a batch to see the details of the invoices and interrogate any that haven’t been sent.
- Invoice Print Batches – Merchanter can be set to either print invoices with every invoice run, or save the print invoices to be printed at a later date (once a month for example). This delayed invoice printing can save postage costs where a customer receives multiple invoices for the month in one envelope, but it requires additional management and processing over print as you go.