Doing a fast retail sale in Merchanter
How to add a quick cash sale from the basket in Merchanter

Written by Ian Oldrey
Updated at June 14th, 2023
Table of Contents
Adding a fast retail sale is useful for trade counter sales, or taking quick phone orders.
The quick retail sale is limited in the options you have, so that the process can be as fast as possible.
Overview video - Entering a retail sale
If you are looking to enter a more advanced quote or order with negotiated prices, multiple stock sources, deposits, etc. then use the main new sales order process.
Retail sales don't warn about stock
With a retail sale if you say you are selling an item the system will take it from stock, even though this may make the stock go negative. The basket shows the physical and free stock at the depot you are logged into, but there is no warning about available stock if you choose to sell it, as the customer is taking that item with them so it needs to be marked as moving out of stock, even if this has an impact on supplying other orders.
Creating a Retail sale
Step 1 - Adding items to the basket
- Open the basket using the basket icon in the top banner of Merchanter
- Add items to the basket (see using the basket article for details)

- The total value of the basket items based on Base Price is shown in the top right corner
- When the customer is ready to order click on the ‘Checkout Retail Sale’ button
Step 2 - Confirming the order details
- This goes to the order confirmation screen
-
Order number/Lines/Value - the gold banner gives the basic order details
- Order number - this is generated by the system
- Number of lines - this is the number of order lines
- Order Value - this is the order value (inc. VAT) which is calculated according to the customer for the order and the quantity being purchased
- Customer - this defaults to the default trade counter customer, but can be changed if the customer has a customer record/account with the business
- Customer reference - useful to add the customer name for future order lookup
- Contact - will be blank for a trade counter customer, but can be selected for other accounts
- Sales Rep - should default to your user (there are options to set the customer rep as the default)
-
Discounting - amending any of these 3 fields updates the total order value
- Discount (%) add a percentage discount either entering a number in the box or using the quick buttons for 0% 5% and 10%
- Whole order discount - a value to be discounted
- Total inc. VAT - the total value you would like to make the order
- Delivery Type - this is defaulted to ‘Supply Now’ for a retail sale
- Payment Type - this is defaulted to ‘Cash Sale’ for a trade counter customer, but could offer ‘Pay on Account’ for a customer with a credit account
-
Order number/Lines/Value - the gold banner gives the basic order details
Step 3 - entering a payment

- Total order value and any balance to pay are shown in the top right corner
- Select a Tender type (payment method)
Write your initial question/sentence to troubleshoot
Selecting cash (or other cash type payment method)
No default amount is offered - the amount being tendered needs to be entered (i.e. the customer might pay with £30 for the £24.56 order in the screenshot below, in which case 30 should be entered into the payment window)
You can enter the amount tendered in 3 places:
- If the customer hands over notes the left hand column has fast amount buttons. Clicking on these will add the value to the payment value box. You can click on a note tender button multiple times for the number of notes offered (For the £30 example you could click on £20 once and £5 twice)
- The screen number pad (centre) can be used to key in the value being tendered
- Select the payment value box on the right hand side and type in the value using your keyboard. (the value does not require a currency symbol at the front of the entry (so 30 not £30)
 When you have entered the amount tendered click ‘Confirm Payment’
Any change due will be shown on a pop up
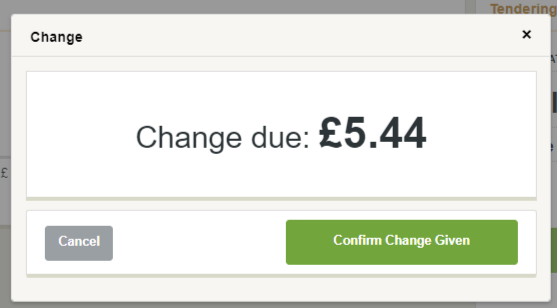
Click ‘Confirm change given’ once done
For non cash tender types the full balance to be paid is entered into the payment box.
You can amend the amount tendered in 3 places:
- The left hand column has fast amount buttons. Clicking on these will add the value to the payment value box. You can click on a fast amount button multiple times for the number of notes offered (For the £30 example you could click on £20 once and £5 twice)
- The screen number pad (centre) can be used to key in the value being tendered
- Select the payment value box on the right hand side and type in the value using your keyboard. (the value does not require a currency symbol at the front of the entry (so 30 not £30)
 When you have entered the amount tendered click ‘Confirm Payment’
Part and fully paid orders
Has the customer fully paid for the order?
If the order is fully paid an Issue Documents Window will open.
Document setup
Depending on the configuration of your system the document types, whether they are printed or emailed, and where or to whom will vary.
A typical selection for a cash sale would be:
Cash Sale invoice with options to
- A4 cash sale invoice on a laser printer
- retail receipt on a receipt printer
- email pdf of A4 cash sale invoice to the customer
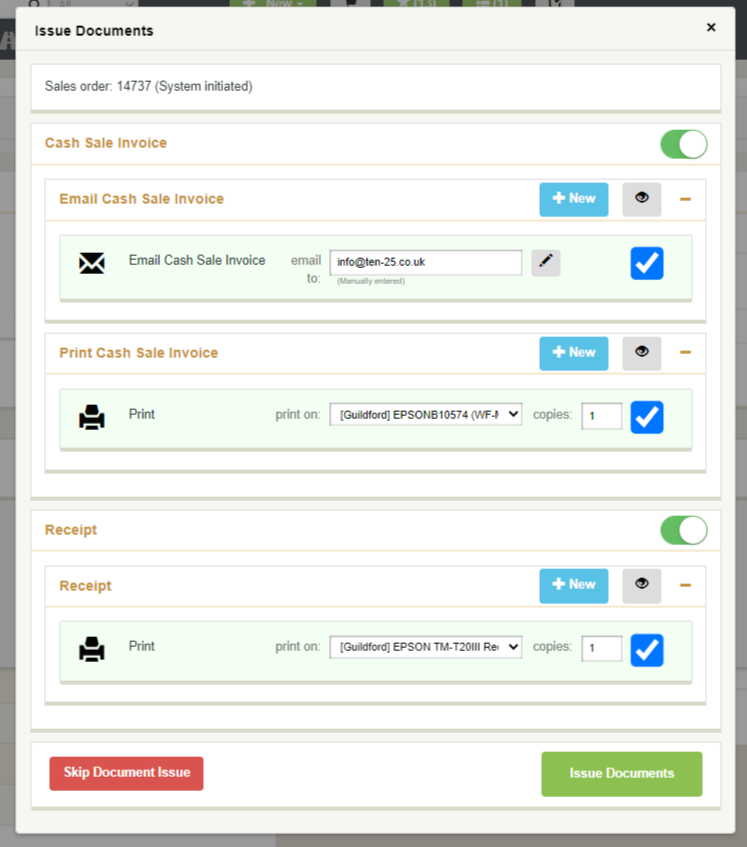
Select the options to create for this order and click ‘Issue Documents’
This goes to the Cash Sale Payment summary window.
Click ‘Done’ or ‘Close’ to return to the basket
Ideally fast retail sales should be fully paid as the items are being taken at that point in time.
If an order is being part paid
- Enter the value to be tendered
- Once you click ‘Confirm Payment’ you will be returned to the payment window with a revised balance to pay
- If the customer is making an additional payment with a different tender type this can be entered
- Otherwise click on ‘Close’
This will go to the Cash Sale Payment summary window with options to:
- Enter payment - add an additional payment to pay off the balance
- Close - leave the order placed and part paid
- Supply part paid order - will mark the order and items as supplied but with an order balance left to pay
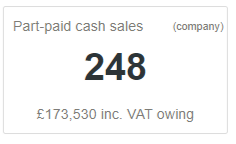
Part paid orders KPI
There is a KPI that shows the part (and unpaid) cash sales so they can be chased
Creating a Retail Sale for an Account Customer
If you have a regular credit account customer buying items from the trade counter, it is a quick process to serve them.
Step 1 - Adding items to the basket
- Open the basket using the basket icon in the top banner of Merchanter
- Add items to the basket (see using the basket article for details)
- The total value of the basket items based on Base Price is shown in the top right corner
- When the customer is ready to order click on the ‘Checkout Retail Sale’ button
Step 2 - Confirming the order details
- This goes to the order confirmation screen
-
Order number/Lines/Value - the gold banner gives the basic order details
- Order number - this is generated by the system
- Number of lines - this is the number of order lines
- Order Value - this is the order value (inc. VAT) which is calculated according to the customer for the order and the quantity being purchased
- Customer - this defaults to the default trade counter customer, use the Fast or Advanced search to find the customer record
- Customer reference - add if required or offered by the customer
- Contact - can be selected if there are contacts listed in the dropdown
- Sales Rep - should default to your user (there are options to set the customer rep as the default)
-
Discounting - amending any of these 3 fields updates the total order value
- Discount (%) add a percentage discount either entering a number in the box or using the quick buttons for 0% 5% and 10%
- Whole order discount - a value to be discounted
- Total inc. VAT - the total value you would like to make the order
- Delivery Type - this is defaulted to ‘Supply Now’ for a retail sale
- Payment Type - this will be ‘Pay on Account’ for a customer with a credit account, you can optionally select ‘Cash Sale’ if they wish to pay cash for this order
-
Order number/Lines/Value - the gold banner gives the basic order details
- Click ‘Confirm Order’
Step 3 - Document Issue
Once the order is confirmed the document issue window will give a choice of documents to print/email for the customer.
Typically for a fast retail sale for an account customer this will be a Customer Collection Note
Document setup
Depending on the configuration of your system the document types, whether they are printed or emailed, and where or to whom will vary.